Showing posts with label homemade. Show all posts

Monday, 5 March 2012

Paper crafting

After seeing a pin on Pinterest recently from the blog, Homespun with Heart, I decided to have a go at making some paper flowers.

I then used these to decorate a heart, which I plan on hanging up with some ribbon as a cute decorative item.

Here are a few pictures of my first attempt


If you look carefully (though not sure it shows up too well on this picture) there are small gaps, and I'm not totally happy with all the flowers, though as I have made more I have gained confidence with them.

Therefore I am going to attempt another one, hopefully make it gap free, with flowers that are more similar in height, but not necessarily size as I think that variation helps with the look.

As I do plan on making another because I wasn't totally happy with this one I haven't bothered adding the ribbon to it.  However, my mum didn't want this first attempt to go to waste, as I was just planning on putting in my craft box and probably forgetting about it, so she has used it in her bedroom and stuck it in the middle of her bed head board (What would we do without proud parents????)
I have to say though, from a distance it looks pretty cute (if you dont get close enough to notice the gaps)


Will keep you updated with any new ones I make.

Until next time :-)

Thursday, 1 March 2012

Completed Owl Doorstop

Today I finished my full size owl doorstop, and am really pleased with it.

Its a nice size and weight to do it job, and the sewing on it is a big improvement from my very first experiment.


And here it is in comparison to my first two owls....

I am really pleased with how its come out, and seems other people are too as I now have a request for my first commission one! Bonus!

Hope my readers also like them, and as usual any feedback always welcome!

Until next time

Oya Designs

Wednesday, 29 February 2012

Textile Owls

So I have made further progress on my owl designs to hopefully use as doorstops.  I have so far made two mini versions, both with their good points and bad points.

The first one I made was the one with green eyes.  It had been a good few years since I last used a sewing machine, so used this first one to try and figure out the best way to attach each component of the owl.

I used the sewing machine to pretty much attach everything, the eyes, eye outline and beak.  I thought this looked a bit messy tho, particularly the eyes, so with the next owl I made I attached the eyes with the sewing machine, but just using black cotton to attach both the black and whites of the eyes just sewn through the blacks of the eyes, and this was sewn onto the eye outlines.  I then hand stitched the eye outlines onto the body, which I think looks a lot better.  I stuck with sewing the beak on with a zig zag stitch on the sewing machine but didn't bother with the stitching down the sides of the beak.


When it came to the wings, with the first owl I attached them with a hand stitch at the top of each wing, so the stitch and seam was visible.  With the second owl, however, I tried to hide the stitching as much as possible, still doing it by hand but pushing my needle through the body fabric and the underside of the wing to try and hide it as much as possible.

 Each owl was stuffed with craft stuffing and rice to give them some weight. The second owl I think was stuffed better than the first, knowing to use more of everything to make it bulkier.

These two owls only measure about 25cm tall and 25cm wide.  I now have the fabric cut out to make one double these sizes, hopefully using what I have learnt to make a much better version.


Will keep you updated with the progress of these.....................
........................til next time!

Friday, 3 February 2012

Update on Current Projects

Hiya all!!!

Just wanted to update my followers on my current projects I have going on, not only to keep you guys in the loop, but too keep my motivation high :-)

I currently have underway a tiger cub cross stitch, which I plan to use to make a handmade sketch book for a friend.  I also have begun experimentation with different patterns to make an owl doorstop.  Also plan to look at other animal designs for this too, but for those who haven't already been able to guess, my dad is owl mad, so the initial idea was for him.

Additionally, though I haven't yet begun them, I have bought the necessary wool to make an infinity scarf/snood, and a mobile with teddy bears.

This is the first attempt at the owl design for my door stop, its only a miniture version, but the pattern will be the same.
Will keep you all updated on how it all goes, and if you haven't yet subscribed to my blog please do.

More craftyness to come!!!!!


Monday, 30 January 2012

I'm back and ready for ACTION :-)


Its been a while since my last post, and to be honest my crafts have sort of taken a back seat while various things have been going on, like moving house, and the due date for my baby is now fast approaching :-/

But I did just want to up load some of the pictures of cards I made this Christmas, and a picture of some handkerchiefs I made for my dad too.

CHRISTMAS CARDS

All these cards have been made from various bits I've had in my kits and free papers I've received in magazines I've bought.


HANDKERCHIEF

Here are some simple handkerchiefs I made for my dad with an embroidered owl on them


He absolutely loved them as he is a big fan of owls, or more specifically the Mighty Owls (Sheffield Wednesday)

Now its just time to start with my 2012 projects, and I have a lot of ideas in mind, trying my hands at a few new things and revisiting a few old tricks.  

So heres to a happy crafty 2012 !!!!!!!!


Saturday, 12 November 2011

Quick update for loved Parents

I just want to make a quick post as regarding a card I made for my parents anniversary recently.

It was a card I was inspired to make after watching Kirsties Handmade Britain series on Channel 4.

Basically, its a card made up of different hand made papers, which I then cut into simple but effective shapes of a bird with wing and eye, on a branch, and a banner.  These were all sewn onto my backing paper (after being glued, as to not move around whilst sewing).  I think the finished effect looks really pretty and it is definitely a method I shall be using again!


The countdown is on!

In recent weeks I have been working towards my favorite time of year, and planning gifts and cards and such.  I love Christmas, especially making different present for my most favorite and loved people in the world and that's my friends and family.

I have made a list of possible gifts:


  • Teacup Candles
  • Embroidered Handkerchief 
  • Cushions of various designs
  • Butterfly Clips (previous blog)
  • Decorated Picture Frames
  • Truffles
  • Homemade Body Scrub
  • Wheat Packs
  • Decorated candle holders
I haven't yet made a decision on who will be getting what, (I know only 42 days till Christmas), but this is the aim over the next 6 weeks, to get this sorted and ready.

I know I need between 10 and 14 presents, depending on what I am giving to who (no good giving a couple a present that only one of them can use, in my opinion), but I think how I am going to plan it is just making what I want to make, then decide at a later stage who gets what!
I already have requests for truffles off of a couple of people after making them for my brothers birthday in September, and them going down a storm with other guests at his party.


As well as gifts I also have to start thinking about Christmas Greeting Cards. The last few nights I have been working on some Forever Friends decoupage images I recently bought from Hobbycraft in order to make some, if not all the 16 cards (at least) I'll be needing to give out this year to friends and family.

So now you know where I am with planning for my Christmas.  As usual any questions or comments please don't be shy and leave a comment, or even get in touch.

Until next time

Sam <3 <3 <3

Thursday, 20 October 2011

Current ongoing projects

Hello Readers,

Today I thought I'd update you all with some of the projects I currently have on going.  I find myself being quite scatty with my projects, starting and working on one, until I need to order something or go and buy something, by which in the mean time end up starting another project.

Anyway, the two main projects I have going on at the moment are my Butterfly clips and paper mache letters.

BUTTERFLY CLIPS

These clips were originally inspired by some butterflies my mum bought from a shop.  I thought them to be quite expensive for what they were and had a bet with my mum I could make them for the fraction of the cost - and so I did.  I have made a handful butterflies since I begun experimenting with these. They have evolved with each one as you would expect.


Originally I was just making the butterflies from jewelry wire and a black mesh sewn onto the frame, and embellished with black glitter.  With these, though, I found making the body difficult and hard to make it secure with the wings in place.


I have also experimented with tissue paper as the wings (right) and beads joined to form the body. 

 My latest experiments have been sewing some detailed lines onto the wings.  I have some clear jewels also, that I plan to experiment with as part of the pattern on the wings.

I have also recently purchased some crocodile hair clips from ebay, in order to mount the wings and body to, to make them more similar to the ones my mum bought, and so that they can be clips to various objects as decoration. 

Like I said this is an on going project, so will keep you updated with my experiments, and hopefully I will be able to achieve a few final butterflies that I am able to give as Christmas gifts this year!!!


PAPER MACHE LETTERS

After recently visiting a craft cafe I saw some decopatch being demonstrated, with paper mache letters and animals.  Again, I found the price of the paper mache letters expensive, and thought, with a bit of time I can easily make them myself, so I have done.


I made the letter templates out of card board and selotaped about a 2cm edge round the letters to make them block shaped.

 I then paper mached the letters to make them secure.  I then planned on decorating them with some decopatch paper.  However, my mum has recently also seen these and has decided that she wants them spray painted silver for her bedroom, so looks like I'll be making another set of letters to accommodate her request too.


So thats what I have going on at the moment, along with my planning for Christmas, and my Christmas card list.

Hope to see you again soon

Sam

Wednesday, 12 October 2011

New Toys

Having recently taken my interest a little more seriously of late, I have recently taken a trip to Hobbycraft and bought myself some new toys.

First, a quick note on Hobbycraft. I love this shop.  It's the only really good craft place (that I know, and I don't proclaim to know a lot, lol) I can go in Sheffield where I am actually able to view what I want to buy before I actually buy it.  However, when you look about on the deals you can get on the web it is quite over priced.

I would love to hear anyone else's view on this and where people actually get their craft supplies from.

Anyway, I had time on my hands where I could spend time getting creative, so my lack of patience led me to buy a few bits and bats from Hobbycraft so I could crack straight on when I got home.

Here is what I bought:

A butterfly paper punch
A heart paper punch
Acrylic stamp block
Pack of Birthday Stamps
Pack of 2 butterfly stamps
Black ink pad
Gold/Silver/Bronze ink pad
Red/Green/Black in pad
Forever friend decoupage Christmas pack
A Christmas pack of various card-making accessories (papers, toppers, decoupage)

As you can see my thoughts are currently focusing on Christmas, and what I can do for everyone.

Anyway, I have been playing around with bits of my kits and wanted to show you what I have been able to do.


These 6 cards were made from the Christmas pack I bought, using decoupage, toppers and papers provided in the pack. The 'Christmas Wishes' and 'Merry Christmas' were done with my new stamps too.  On the card in the top left corner, the 'Noel' was a topper provided in the pack, and the main background was achieved with a robin stamp I got in my pack, with the red and green ink pad I also bought.


The card on the left was made, also with the the Christmas pack decoupage and paper. The stamp was again from the Christmas ones I bought.  However, also on this card I used my embossing board which came in my pack. It doesn't show up very well in this picture, but I used a snow flake, which I embossed around the edge of the decoupage topper (all the white area), which I thought looked pretty cool.

The card on the right was made with my Birthday stamps, the background paper was one I already had in my kit. The stamps I coloured in with my metallic pencil crayons.


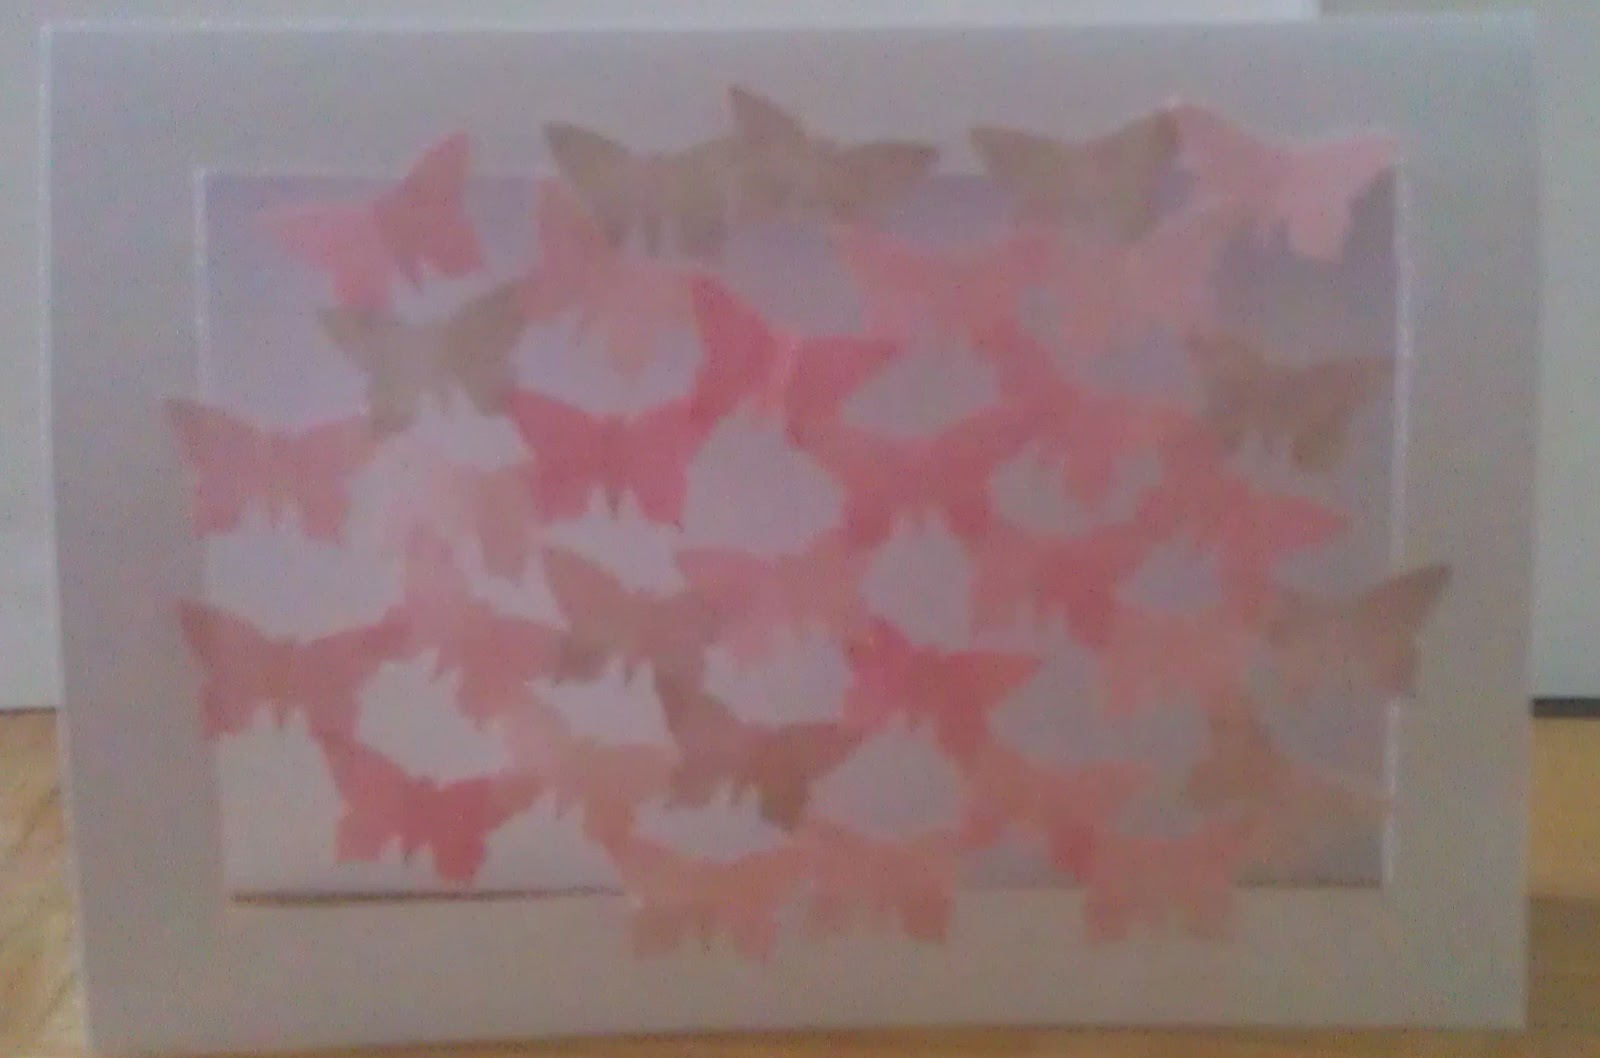
I have also done another 2 cards using the butterfly paper punch I bought.  I coloured half a sheet of A4 cartridge paper using pastel pencils with a red and a brown colour.  I then used the butterfly punch to cut out various butterflys, and used them to create these two cards.

 
Again please feel free to leave any comments, feedback would be much appreciated.

Thanks and see you for now. Hopefully speak again soon.

Sam <3<3<3